Shopping Cart
- Current Version: 4.0.0
- Last Updated: 13 July 2017
- License: Commercial License
- Compatibility: OpenCart 1.5.1.x, 1.5.2.x, 1.5.3.x, 1.5.4.x, 1.5.5.x, 1.5.6.x, 2.x, 3.x
Description
Shopping Cart is a simple module to display the customer’s shopping cart anywhere on your website. You can place it at left, right, top, or even bottom of the page’s layout in your OpenCart store. It also comes with animation when you add an item to cart.
Features
- Auto update cart when an item is added
- Animation when an item is added
- Animation available even if cart is not displayed
- Simple styling to match your theme
- Small cross beside each item for quick removal from cart
Installation
OpenCart Cloud
- Purchase the extension from your administration panel.
- Proceed to
Extensions >> Extensionsand selectModules. Then, installShopping Cart. Configure extension accordingly. - Proceed to
Extensions >> Modificationsand click the blue refresh button. - Go to the layouts management page in your admin and add this module to the layout you wish to display on.
OpenCart 3
- Go to
Admin >> Extensions >> Installerto upload the extension zip file. - Proceed to
Extensions >> Extensionsand selectModules. Then, installShopping Cart. Configure extension accordingly. - Proceed to
Extensions >> Modificationsand click the blue refresh button. - Go to the layouts management page in your admin and add this module to the layout you wish to display on.
OpenCart 2
- Unzip the files. Ensure that vQmod has been installed.
- Upload the files WITHIN the upload folder to your OpenCart installation folder with a FTP client. The folders should merge.
- In your admin panel, proceed to
Extensions >> Modules. Then, installShopping Cart. Configure extension accordingly. - Go to the layouts management page in your admin and add this module to the layout you wish to display on.
OpenCart 1.5
- Unzip the files. Ensure that vQmod has been installed.
- Upload the files WITHIN the upload folder to your OpenCart installation folder with a FTP client. The folders should merge.
- In your admin panel, proceed to
Extensions >> Modules. Then, installShopping Cart. Configure extension accordingly. - Add this module to the layout you wish to display on right from the module settings page.
Configurations
OpenCart 2, 3 & Cloud
-
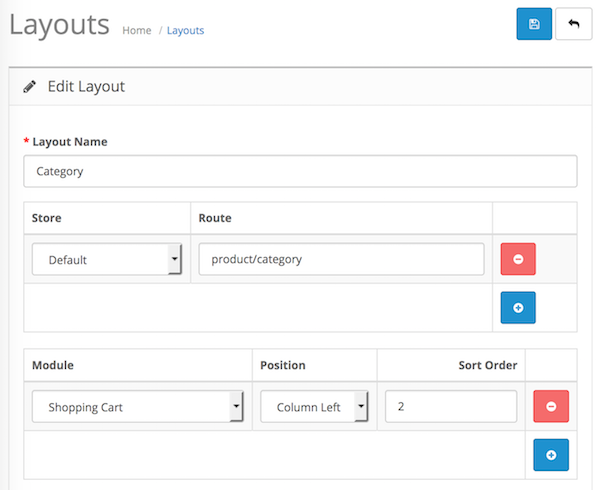
Adding Module to Layout
Once you have installed and enabled the extension, you can add the extension to your layout through the OpenCart's layout management page.
OpenCart 1.5
-
Adding Module to Layout
Once you have installed the extension, you can add the extension to your layout through the Shopping Cart module settings page itself.
Change Log
Version 4.0.0 (13/07/2017)
- Fixed compatibility with OpenCart 3.0.0.0
- Fixed minor bugs and improvements
- Ceased support for OpenCart 1.5
Version 3.3.5 (26/09/2016)
- Fixed minor bugs
- Added minor improvements
Version 3.3.4 (12/07/2016)
- Fixed compatibility with OpenCart 2.3.0.0
Version 3.3.3 (08/03/2016)
- Fixed compatibility with OpenCart 2.2.0.0
Version 3.3.2 (24/02/2016)
- Fixed compatibility issues with OC 2.1.0.0
Version 3.3.1 (20/05/2015)
- Fixed minor permission issues
Version 3.3.0 (14/05/2015)
- Minor admin aesthetic improvements
Version 3.2.4 (23/04/2015)
- OC 2.0.2.0 mail support compatibility fix
Version 3.2.3 (02/04/2015)
- OC 2.0.2.0 compatibility
Version 3.2.2 (28/01/2015)
- OC 2 version bug fixes
Version 3.2.1 (23/12/2014)
- Updated support Facebook link
Version 3.2.0 (10/10/2014)
- Added OpenCart 2.0 compatibility
Version 3.1.0(25/06/2013)
- Bug fixes for v1.5.2.1 to v1.5.5.1
Version 3.0.0 (07/05/2013)
- Animation now on all pages
- Merged for all different versions of OpenCart
- Support desk in admin panel